minecraft animals

In this project we have made minecraft animals out of shapes for elementary kids. We used Autodesk Inventor Professional 2014 to make, dimension, and assemble the animals we picked. First, we created then measured all the parts to a .1 scale. Next, we assembled the parts to create 5 animals. Then, we had drawing files for an easy way to see the dimensions and views. Later we exploded the parts to give a better view on how the parts go together. After this all was finished, we 3D printed 1 of the 5 animals to give to an elementary student.
We were to create 5 animals, these are the two animals that continued through all the processes.
|
|
Here is the minecraft Pig. The pig is one of the best sources of food in the game. The parts for this was rectangles and squares. The pig was a quick and easy assemble. One little problem was the head, once I got to the assembly I realized the head wasn't just a square; Therefore, I went back and fixed the problem. |
|
|
This is the exploding minecraft creature called the Creeper. For this creature we needed rectangles and squares. One problem I had with the creeper was trying to offset the head. |
rubric
|
The wolf was a harder animal to make. For example I had a problem with the tail trying to get it at an angle. Another little problem going on was figuring out how to get the body together and perfect. Lastly, I did not have the time to complete drawing files. Summary: This project was very fun and I learned many things on Inventor Pro. The parts were not hard because they were mainly squares and rectangles. All in all this was a great project to start us up on learning this program. |
TRICK MY TRAIN

In this "TRICK MY TRAIN" project, we are too complete three sets of four parts. As soon as the parts are finished we have to create drawing files to get a better idea at the parts. Once these sets of parts are completed we need to assemble and explode the train. After all this is completed we are too create our own "new part" to the train, a drawing file must be finished to this as well. Once the parts are made we can now assemble, explode, and even color our new train.
|
|
This slideshow contains the assembly, drawing files, and exploded views of the original and new train.
|
Problems:

|
COW CATCHER
The Cow Catcher was the most challenging part for me. I was not able to mirror the offset to the other side of the part. After creating a new plane I was able to complete the part. |

|
WHEEL
The Wheel was also very difficult since there were so many angles, holes, etc. After watching a few videos and asking a few classmates I finished the part. |

|
LINKAGE ARM
The Linkage Arm took a while because I made a mistake and used the Hitch Peg dimensions for this part, but I recreated the parts with the right dimensions. |
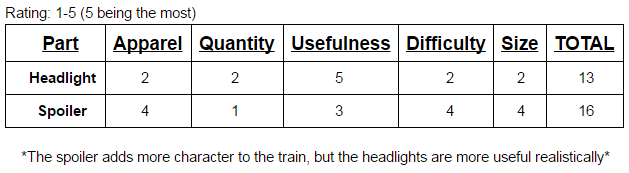
Decision matrix:
Rubric:

SUMMARY: After completing my new parts I have learned a few new tools in the Inventor Pro. A couple tools I used a lot for my new parts were "Fillet" and "Chamfer". My parts were fairly easy, it was constraining them to the body that got me stuck for a while. Overall, this project was fun and challenging and I am pretty satisfied with my finished project.
